Studio photo portraits of men. Male photo shoot in the studio, male portrait. I want to purchase a gift certificate for a Men's photo shoot for my boyfriend. How can I get it
Zach Sutton shares his experience in creating spectacular night portraits.
Throughout my career as a photographer, I've often been to some pretty unusual places at some pretty weird hours of the night—or rather, very early in the morning. During my nightly adventures, I more than once lost lighting equipment without compensation (umbrellas were carried away by the wind, lamps toppled over along with the stands), broke my camera and even my limbs.
I learned a lot about working in the dark. I hope this article will help you save time, money and stress when you decide to go shooting at night.
This article will be useful to you, provided that you use at least some kind of off-camera lighting: external flash, light block, etc.
In addition, you should prepare your equipment for transport. If you need to walk a couple of kilometers to get to your location, be sure to pack your lighting equipment securely. The only thing worse than carrying all the equipment on yourself is carrying that equipment on yourself in the middle of the night.
How to take a portrait at night: Shooting location
When choosing a shooting location, take into account all possible factors that may interfere with you. Remember that what does not interfere during the day can become a significant obstacle at night. I think few would argue that filming in an abandoned warehouse during the day and in the middle of the night are completely different things.
It is extremely important to ensure that you have a constant source of light on location to illuminate your work area. You just need some kind of ambient light - be it street lighting, light neon signs or the headlights of your car.
Once again, this is very important - otherwise you risk constantly tripping and knocking over equipment in pitch darkness. Of course, many modern DSLRs are quite well protected from adverse weather conditions and accidental impacts, but I can guarantee that when it comes to pitting a magnesium alloy camera body against concrete, the camera always loses.
Plus, even the weakest constant light will make it easier for your camera to focus. There's nothing more annoying than the sound of your camera's autofocus motor struggling to focus. You will say that in this case you need to use manual focusing - well, try this when you do not see anything in the viewfinder.
If your shoot doesn't have a readily available constant light source, you'll have to create one yourself. One solution in this case could be an LED flashlight. It's incredibly compact, lightweight and inexpensive, but produces a lot of light - so there's no good reason for any photographer not to have it in one of the pockets of their camera backpack.

Tip: Have your subject hold the light source close to her face so you have enough light to focus. This will allow you to free both hands to operate the camera. Once you've locked the focus, simply ask your model to remove the light from the frame.
Night Portrait: Working with Ambient Light
More than once you will be faced with a choice: work with ambient light or block it completely.
If you shoot with a multi-flash system, you have a greater degree of control over the lighting of the scene: you can completely block out ambient light and light the scene solely with flashes. This usually means having flashes set to illuminate the background. This allows you to use a faster shutter speed and easily find the optimal balance for exposure and subject and background.
If your lighting options are more limited, it's a good idea to work with the ambient light rather than fight it. This can be done using a long exposure. I usually get a well-exposed environment using my camera's light meter.
After metering in natural light, I record the settings and then make adjustments to the flash power settings to balance the two light sources. This helps to underexpose the background a little. It will also help you in cases where there is too little ambient light falling on your subject.
How to Shoot a Portrait at Night: Workflow
I'll walk through simple example which illustrates how you can quickly get enough good pictures, with the help and correct positioning of the light.
Test footage
First, measure the ambient light at several points around your shooting location - this will give you an idea of the degree of light dispersion.
Here's my first shot, taken with the camera settings suggested by my light meter. It looks too dark as expected, but that will change once we add our main light source. In the meantime, we see only the highlighted hair and part of the silhouette:

Then I add my strobe flash (with a honeycomb beauty dish mounted on it) at 1/4 power to see what happens.

The photo is still too dark and the right side of the model is not lit.
In the next shot, I raised the ISO sensitivity, opened the aperture a little, and increased the flash power a little.

Well, the result looks much better already.
I then adjusted the position of my main light source to give my model a more dominant position in the frame.

At this point we have some nice highlighting of the smoke and highlighting it, some background lighting that gives depth to the scene, and a well-balanced exposure on our model's face. It took me 15 minutes to do everything, including installing the equipment.

This is a shot of the setup used for the above shoot. Of course, the ambient light is a little lacking, but you can also see the tripod where my camera and all the lighting equipment was located. When shooting at night, I like to use a honeycomb beauty dish because it puts the light exactly where you want it.
If you use a beauty dish without a honeycomb for night photography, your scenes may look unnatural due to excessive lighting.
In the photo you can also see striplight. I didn't use it during the photo, but I placed it in case there wasn't enough light from the beauty dish.
Post-processing
Below you can see the final version of the photo after I processed it.

All I did during the editing process was remove some distracting background details, desaturate, lighten/darken areas of the image, and sharpen. Everything is very easy and simple.
More sample photos
Here are some more examples of night portraits from my archive.
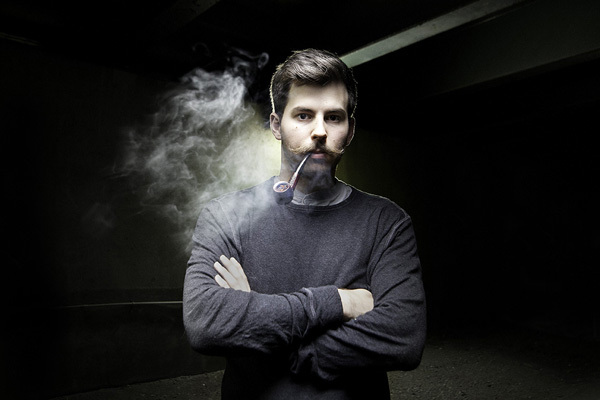
Guy with a cigar
In this example, you can see that I lit the model from above with hard light, simulating street lighting.

You'll notice that I used a high ISO (800 or so) to make sure the background would be visible at least a little. Of course, I had the opportunity to use a slow shutter speed with a lower ISO, but in this case the smoke in the photo would have been blurred.
With fast shutter speeds and high ISOs, it's much easier to get the nice, clear smoke that appears in the final image. I didn't shoot wide open because I wanted to get the model's entire appearance in focus. At the same time, I didn't stop the aperture down too much to get a fairly soft and blurry background.
For this photo, I chose a warm palette to enhance the illusion that the photo was taken under the light of real tungsten street lamps. This, of course, is purely my imagination, because in most cases, street lamps do not install lamps with tungsten filament. Street lamps are most often filled with sodium vapor, which tends to produce a greenish light.
Girl in the street light

For this shot, the model was lit with octaboxes positioned above and behind the camera. The girl was photographed on a fairly well-lit street, which is why large bokeh from snowflakes and street lights are visible in the photo. The shot, like the previous one, was shot at high ISO, but with a fairly wide aperture of f/2.8.
I tried to keep the foreground colors natural. The photo is in a fashion style, so I wanted the colors to look the same in the image as they look in real life. In catalogs you will hardly find a single photograph toned in sepia style, because people want to see what color the clothes actually are.
Be a night owl
I hope the above has given you an idea of how I work and think when shooting at night.
Publication date: 20.03.2017
NIKON D600 / 50.0 mm f/1.8 SETTINGS: ISO 125, F5.6, 1/160 s, 50.0 mm equiv.
Women's photo sessions are more popular than men's, but everyone needs a good portrait - for a resume or portfolio. Today we will look at shooting a studio male portrait. This article will be useful for those who have never photographed in a studio or have encountered some difficulties in the process of creating studio portraits.
Musicians from the bands Subcultura and Scarfs took part in the photo shoot for this article.
Preparation
There are two types of studios: interior and background. For beginners, it is better to find the simplest studio possible so that you can practice and understand how to work with light.
Ask the model to send photos of clothing to create several looks. After that, determine what kind of background you will need, think about the poses and emotions of your hero.
At the beginning of the shoot, you need to establish contact with the model: ask about hobbies, tastes in cinema and music. You can simultaneously set the light, set up the camera, and choose the background. Communication helps to relax, which is important, because a photo shoot is an exciting event, especially for those who find themselves in the studio for the first time. During the shooting process, explain to the model where to look. This will help you get a good angle. For example, when the gaze is not directed at the camera, more atmospheric photographs are obtained.
 NIKON D600 / 50.0 mm f/1.8 SETTINGS: ISO 125, F6.3, 1/160 s, 50.0 mm equiv.
Make sure that the model does not hunch over, lift up or lower her head too much. The chosen poses should look natural in the frame.
 NIKON D600 / 50.0 mm f/1.8 SETTINGS: ISO 125, F7.1, 1/125 s, 50.0 mm equiv.
What to shoot with
Studio photography is not so demanding on photographic equipment. You can work with amateur cameras Nikon D3300, Nikon D5500 and get excellent results. It is convenient to use prime lenses: AF-S 35mm f/1.8G ED Nikkor and AF-S 50mm f/1.8G Nikkor for full-length portraits, and AF-S 85mm f/1.8G Nikkor for waist-length and bust-length portraits. You can also shoot with zoom lenses. My arsenal includes a Nikon D600 camera and an AF-S 50mm f/1.8G Nikkor lens.
Camera settings for studio shooting
When using flash lighting in the studio, it is worth shooting at the minimum sensitivity values: ISO 100 or ISO 200. The shutter speed is fixed at 1/125 s. If we make it shorter (1/160, 1/200), we will get a black stripe in the photo because the light from the flash will not keep up with the shutter speed. Shutter speed, of course, depends on your camera model, but 1/125 sec is universal in most cases. The aperture changes depending on the brightness of the light. It is better to adjust white balance manually. For studio shooting, values of 5260 or 5560 K are good for accurately conveying skin color.
So, the main parameters:
- shutter speed: 1/125 s;
- aperture: depends on the situation, usually from F7;
- ISO: the lower the better;
- White balance: 5260, 5560 K.
Types of light-forming attachments
|
|
Softboxes come in rectangular and square types. They give soft light. The larger the softbox, the larger the area it illuminates, so for life-size photography it is better to choose a large softbox, and for shooting the model’s face - a small one. |
|
|
Octaboxes are shaped like an octagon. As a rule, they are quite massive and provide soft light. With their help you can imitate natural daylight. |
|
|
Stripboxes are rectangular. They are good for creating highlights in backlight. |
|
|
The reflector (“pot”) produces hard light and is optimal for creating pronounced shadows. |
|
|
A beauty dish is similar to a reflector, but it produces softer light. |


Let us immediately note that the nozzles in the studio are changed by administrators and it is better not to try to do this yourself, as you may inadvertently bend the lamp or break the protective flask.
Light sources and timing
As for light sources, the main thing here is to choose the flash power: through the display or through mechanical knobs. Take a couple of test shots. Is it dark in the frame? Add more power or move the source closer to the model. Overexposure? Turn down the power or move the light source away and check the aperture value.
Synchronization of the shutter and studio flashes is carried out using a synchronizer. It is installed in the external flash connector, and the receiver is installed in the light source socket. This equipment is always available in the studio.


Light schemes
Let's look at several lighting schemes that can be used when shooting a studio male portrait.
 NIKON D600 / 50.0 mm f/1.8 SETTINGS: ISO 125, F6.3, 1/125 s, 50.0 mm equiv.
The choice of lighting scheme depends on your goals and the wishes of the model. For example, if you need drama, then you need sharply expressed shadows, if you want lightness in the frame, you need soft light without shadows.
Do not place the model directly in front of the background, ask them to take a couple of steps towards you. This will give you more options to work with light.
Scheme 1: one octabox
Let's consider a scheme suitable for all ages and all moods. It is quite simple because it uses only one light source - a large octabox.

You need to think about clothes and choose a background, since such light looks boring on a regular white wall.
 NIKON D600 / 50.0 mm f/1.8 SETTINGS: ISO 125, F5, 1/125 s, 50.0 mm equiv.
The large octabox creates soft lighting and provides strong shadow filling. They often imitate sunlight and are ideal for light subjects.
During the shooting process, ask the model to smile and think about something good.
 NIKON D600 / 50.0 mm f/1.8 SETTINGS: ISO 125, F5.6, 1/125 s, 50.0 mm equiv.
Scheme 2: “Rembrandt” + backing
When creating a male portrait, you can use a harder shadow, as it gives masculinity and expressiveness. I propose this scheme:

Place a softbox or octabox to the left of the model, adjust its height and lower the head with the attachment slightly to the floor (tilt angle 45°). This black and white drawing is called “Rembrandt”. Place a stripbox behind your back to the right to get a backlight on your cheek and shoulder.
 NIKON D600 SETTINGS: ISO 125, F7.1, 1/125 s, 50.0 mm eq.
Make sure that light and shadow do not divide the face in half into an overexposed part and a part that falls into the shadow. Experiment: Move the softbox to the right of the model so that a triangle is formed between the nose and cheek.
There are no special restrictions when creating a male portrait, just like when shooting a female one. The main thing is the imagination and skills of the photographer. What should it be male portrait, we understand the new Nikon training Master's degree together with professional photographers. They will share their secrets Marina Shcheglova , Alexander Annenkov , Pavel Sokolov.
And a traditional competition: we are waiting for your portrait works in the comments here until August 10! We remind you that photos must be taken with Nikon! The author of the best photograph, according to the jury, will receive branded souvenirs from Nikon! Good luck and bright mood to everyone!
“A black and white male portrait always focuses on the model. Visual means include light, shadow, contrast, texture, and black and white light adds drama, brutality and highlights the model’s gaze. In a black and white male portrait, I highlight the following features:
● Texture (skin, hair, clothing, objects in the composition)
The light can be soft or hard. Greater texture is provided by side light, either from above or below, which also adds a light-and-shadow pattern - creating volume in the image.

Light from the window, black background and dark flag on the side
Camera: Nikon D300s
Lens: AF-S NIKKOR 50mm f/1.8G
Aperture: f/2.8
Shutter speed: 1/80
ISO: 200
Focal length: 50mm
● Drama in a portrait
To do this, I usually use one light source and black reflectors opposite the model (on one side, on both sides, on the sides, in front, depending on the desired effect of the drawing), they, by absorbing light, enhance the shadow on the face. This also achieves the effect of sculpting a man’s face, when cheekbones are drawn instead of cheeks, the forehead tends to the sides and brutality appears. In the studio, black reflectors are flags, in the open air there are dark surfaces, buildings of business centers.

Beauty dish, model light, background light and honeycomb cone reflector
Camera: Nikon D700
Lens: AF NIKKOR 24mm f/2.8D
Aperture: f/11
Shutter speed: 1/125
ISO: 200
Focal length: 24mm
●Atmosphericity and volume of the image
In portrait photography, I give preference to natural light; here it is possible to add volume through blurring the background and reflection in the eyes of natural light sources and reflective surfaces, rather than studio softboxes, and the natural movement of the model in the frame.

Evening light, side lighting, light reflective reflector on the side
Camera: Nikon D700
Aperture: f/2.8
Shutter speed: 1/2500
ISO: 500
Focal length: 155mm
● Contrast
Light and dark objects, model's clothing, light, shadow, composition. Preference for natural light over artificial light, as it is more quick way study the model’s face and take the best pictures without wasting time on setting the light.

Morning light from the window
Camera: Nikon D700
Lens: AF-S ZOOM-NIKKOR 80-200mm f/2.8D IF-ED
Aperture: f/3.2
Shutter speed: 1/1000
ISO: 200
Focal length: 145mm
● Depth of sight
To do this, I use a portrait or telephoto lens so that at a distance from the lens the model in her comfort zone can express herself. Portraits with wide-angle lenses create maximum conditions for interaction between model and photographer during the shoot, and add more space to the composition.”

Daytime diffused light. The model is located between two tall dark-colored buildings that act as a dark reflector.
Camera: Nikon D750
Aperture: f/2.8
Shutter speed: 1/250
ISO: 100
Focal length: 50mm
“In my opinion, shooting a male portrait is one of the most interesting directions in photography. Despite the fact that my portfolio contains more female portraits, I find it more interesting to work with men. Perhaps this is due to the style of my shots and vision, since I really love graphics, rhythms, and texture in the frame.

Camera: Nikon D800
Lens: AF-S NIKKOR 50mm f/1.4G
Aperture: f/4
Shutter speed: 1/400
ISO: 200
Focal length: 50mm
● Preparing for shooting
It is very important to evaluate in advance strengths models to present them correctly. I usually select clothes for shooting for a specific person. And, since I am a supporter of classical genre photography, which gave a great contribution to my vision, I prefer not bright clothes, without drawings or inscriptions. As a rule, I try to choose shirts, jeans, coats, raincoats, hats, and glasses.
When choosing clothes, it is very important to understand in advance how I want my shots to look and in what locations I will take photographs. And one more point is to remove anything that may distract the viewer’s gaze from the model.

Camera: Nikon D800
Lens: AF NIKKOR 20mm f/2.8D
Aperture: f/4
Shutter speed: 1/400
ISO: 200
Focal length: 20mm
Before shooting you need to be inspired! Of course, everyone will have their own sources of inspiration: photographs, music, beautifully falling light that was noticed in advance. Sometimes an insight/idea just comes that it would be nice to immediately write down for further implementation.

Camera: Nikon D800
Aperture: f/5
Shutter speed: 1/320
ISO: 400
Focal length: 105mm
● Equipment
I take with me only the essentials: a Nikon D800 camera, two AF-S NIKKOR 50mm f/1.4G lenses and an AF-S VR MICRO-NIKKOR 105mm f/2.8G IF-ED lens. I used to have a wonderful AF-S DX ZOOM-NIKKOR 17-55mm f/2.8G IF-ED lens (an excellent solution for cameras with crop sensors).
I also always have glass and a small mirror with me for creative effects (we’ll talk about this too).
●Shooting
Let's look at the factors on which the process and result of the shooting will depend:
- Mood (look/emotions/postures);
- Location and lighting conditions (shooting outdoors/in studio)
- Creative techniques.

Camera: Nikon D800
Lens: AF-S NIKKOR 50mm f/1.4G
Aperture: f/2.2
Shutter speed: 1/125
ISO: 400
Focal length: 50mm
● Mood
Every man has his own character, and I believe that one of the main tasks of a male portrait photographer is to reflect this character in his photographs.
Sometimes, in order to better understand a model, you need to talk, understand a person’s interests, and delve into his inner world. Then it will be easier to shoot.
First of all, I look at the appearance and determine for myself what interesting things I can emphasize; sometimes one detail is enough (but this is not always the case). Perhaps the model has an attractive look, and we can convey all the charisma through it. Or there are special facial features (rounded or more angular). Hairstyle, image of the model - all this is important for the frame and its construction.
Most often in my shots I strive to show a certain severity, if this is relevant.

Camera: Nikon D800
Lens: AF-S VR MICRO-NIKKOR 105mm f/2.8G IF-ED
Aperture: f/5
Shutter speed: 1/320
ISO: 400
Focal length: 105mm

Camera: Nikon D800
Lens: AF-S VR MICRO-NIKKOR 105mm f/2.8G IF-ED
Aperture: f/4
Shutter speed: 1/400
ISO: 250
Focal length: 105mm
● Location and lighting conditions. Shooting on the street
The choice of location may depend on the combination of clothing color and background, graphics or certain light, which greatly influences the final result.
Once there was a case when, while looking for a location in one of the courtyards of St. Petersburg, I realized that there was nothing better than that one a garbage dump that happened to be nearby. Of course, there wasn’t much of a smell there, but that’s where the excellent slanting light came in (through the bars of the gate), boards with red stripes were thrown in the background, and the nearby wall of the house reflected the light on the model’s face.

Camera: Nikon D800
Lens: AF-S VR MICRO-NIKKOR 105mm f/2.8G IF-ED
Aperture: f/4
Shutter speed: 1/800
ISO: 320
Focal length: 105mm
Let's look at examples:

As we can see, in this frame the background is quite simple - a gray gate with peeling paint. But there is a pleasant and unobtrusive rhythm here, the general color of the background goes very well with the laconic clothes, and the rusty areas of the gate are in harmony in color with the skin. The pose is very restrained and symmetrical. And the sign in the upper left corner complements the frame, creating a slight disharmony (without it the photo will no longer be catchy).
Camera: Nikon D800
Lens: AF-S VR MICRO-NIKKOR 105mm f/2.8G IF-ED
Aperture: f/2.8
Shutter speed: 1/640
ISO: 320
Focal length: 105mm

In the following example we see that the location formed the basis of the frame.
In fact, it was a great success to find a hatch from which such a cloud of steam was pouring out!
Camera: Nikon D800
Lens: AF-S NIKKOR 50mm f/1.4G
Aperture: f/2.2
Shutter speed: 1/2500
ISO: 500
Focal length: 50mm
Sometimes for good shot quite a handsome male silhouette!
The easiest option here is to choose an arch or any other place where no light falls on one side of the model, but on the other, everything is illuminated.

Camera: Nikon D800
Lens: AF-S VR MICRO-NIKKOR 105mm f/2.8G IF-ED
Aperture: f/5
Shutter speed: 1/2000
ISO: 400
Focal length: 105mm

Camera: Nikon D800
Lens: AF-S NIKKOR 50mm f/1.4G
Aperture: f/2.5
Shutter speed: 1/160
ISO: 800
Focal length: 50mm
●Studio shooting
In the studio, I very rarely get attached to the interior; light is important to me!
When working with a male portrait, I most often use hard light to emphasize the brutality of his appearance.
But don't forget about the atmosphere. I can use the light passing through the masks or the light sources themselves as a background.
In the shot with the man in the hat, I used three light sources:
- the reflector shone from the floor through the stepladder onto the background, which created an interesting pattern on it;
- to the left and right of the model there were strip boxes to illuminate the face - this is how the Rembrandt triangle turned out, and the ear and cheek did not merge with the background.

Camera: Nikon D800
Lens: AF-S VR MICRO-NIKKOR 105mm f/2.8G IF-ED
Aperture: f/5
Shutter speed: 1/160
ISO: 200
Focal length: 105mm

Here I used three light sources plus a reflector.
From behind the model, two reflectors shine into the frame, and the light from a beauty dish with honeycombs falls on the face. The lower part of the face is illuminated by a reflector.
Camera: Nikon D300s
Aperture: f/11
Shutter speed: 1/160
ISO: 200
Focal length: 38mm

A beauty dish was used as a background to create an interesting effect that can be interpreted in different ways. Also, the light from this source clearly outlined the outline of the shoulders. From the front, the model is illuminated by two stripboxes, creating a very soft pattern on the face. I added the blue stripes in post-processing.
Camera: Nikon D300s
Lens: AF-S DX ZOOM-NIKKOR 17-55mm f/2.8G IF-ED
Aperture: f/10
Shutter speed: 1/160
ISO: 200
Focal length: 38mm
● Creative techniques
Remember when I first mentioned the glass and mirror that I always carry in my camera bag? I usually use them to reflect rays of light and/or other objects.

Here I used a mirror (I hold it directly in front of the lens). Thus, we get an interesting effect with additional meaning.
Camera: Nikon D300s
Lens: AF-S DX ZOOM-NIKKOR 17-55mm f/2.8G IF-ED
Aperture: f/11
Shutter speed: 1/160
ISO: 200
Focal length: 38mm

Many people call this shot “The Picture of Dorian Gray”
I used two small glasses, which gave a kind of broken mirror effect.
Camera: Nikon D300s
Lens: AF-S DX ZOOM-NIKKOR 17-55mm f/2.8G IF-ED
Aperture: f/5.6
Shutter speed: 1/160
ISO: 200
Focal length: 38mm

The final example, where glass was also used to create atmosphere in the frame (it reflects the honeycomb from the beauty dish).
Camera: Nikon D300s
Lens: AF-S DX ZOOM-NIKKOR 17-55mm f/2.8G IF-ED
Aperture: f/10
Shutter speed: 1/160
ISO: 200
Focal length: 38mm
In conclusion, I want to say that the result of your shooting will depend on a combination of factors. It's not enough to just have a good model, clothes and location. It is important to be able to correctly combine all the components to create a harmonious frame. What is important here is the color scheme, the lighting solution, the style of clothing, the type of appearance of the model, and the mood. The main thing is to always develop your taste, learn new approaches to photography, be inspired by high-quality portraits and not be afraid! Create, experiment, try!”
In this photography tutorial we will share with you the best camera settings for portrait photography. These settings are suitable for photography in natural light and for photography with flash. Whether you're new to portrait photography or an experienced photographer, these tips will be helpful to you.
#1 Best Camera Settings for Portrait Photography
Taking portrait photos in natural light, that is, outdoors during daylight hours, is the most common, so we'll start with the settings for that.
I suggest you go to manual M mode and adjust the camera in it. This way, you'll have more creative control over the exposure of your photo. Of course, shooting in M mode will take a little more time, since here we adjust all three parameters (shutter speed, aperture, ISO) ourselves, but the end result will be better.
Which ISO to install
First set your ISO, we want it to be as low as possible and this is typically ISO 100 on most cameras. Some Nikon cameras have a lower minimum ISO and allow you to select ISO 64. In any case, set the ISO as low as possible to avoid noise.

What aperture should I set?
Step two, choose what aperture you would like to use. For a blurry background, use f/1.4 aperture. If you want the background to be more in focus, you want the portrait itself to be sharper. Use an aperture that is 2-3 stops narrower than its maximum opening (aperture). If you don’t know what exposure stops are, here’s a quick summary: Change exposition on stop(or one stop) means doubling (halving or doubling) the amount of light that enters the lens

For example, a lens with an aperture of f/2.8 (maximum aperture at f/2.8) will be sharpest at apertures around f/5.6 to f/8.

How to choose shutter speed
Once you've set your ISO and determined your aperture, the next step is shutter speed. It will have to be adjusted experimentally. Start dancing from 1/100 and depending on the lighting conditions, either decrease or increase. Take a test shot and check the histogram on the LCD screen.
Make sure that the peak of the graph is shifted to the right side, and details in the photo. Approximately as in the photo below.


The main rule is to set the shutter speed to twice the focal length of the lens. For example, if you are using a 100mm lens, you should set the minimum shutter speed to 1/200 of a second to avoid camera shake and blurred images.
There are exceptions to this rule. If you are using a tripod or have in-camera stabilization like some DSLRs and mirrorless cameras, or you use a lens with built-in image stabilization, then you can photograph at longer shutter speeds.

#2 Best Camera Settings for Portrait Photography Using Flash
When it comes to using flash, there are several different types of flashes that are widely used today. There are small flashes that are suitable for mounting on a camera, and there are large studio flashes - strobes.
They all function differently. Some don't allow you to shoot at shutter speeds faster than 1/200 sec (this is the camera's sync speed). Others will allow you to use what's called high-speed sync mode, shooting at a shutter speed of 1/8000 sec.

For such shooting, the cheapest Chinese hand-held flash with a sync speed of 1/200 sec is also suitable. If your flash does not allow you to take pictures at shutter speeds faster than 1/200, you can use a neutral density filter, such as the ND-8, which will darken the image by 3 exposure stops and allow you to shoot at a shutter speed of 1/200 sec and an aperture of 3 stops. more than you could without it.
For example, with a 3-stop ND-8 filter, you can shoot at f/2.8 instead of f/8 for the same exposure. The advantage of this technique is that you can get a normally exposed frame with a shallow depth of field, and not overexposed, as if you were shooting without a filter.

Another important thing to keep in mind if you're photographing outdoors is that you'll get better results if you shoot closer to sunrise or sunset when the sun is less harsh.
The image above was taken one hour before sunset in the shade and provided a nice, even light on the model's face. If you want softer light, avoid shooting in the middle of the day or work in the shade if you can't shoot before sunset.

Check your camera settings and set the LCD brightness level manually and save it for future photo shoots.

Conclusion
If you're new to shooting in manual mode, shooting in manual mode may seem a little daunting at first. But with a little practice, you'll shoot like a pro with it.
If you are interested in shooting portraits with flash, then we have prepared an excellent video training for you that will teach you how to do professional portrait photos using inexpensive flashes, and will also show how to organize a profitable mobile-home photo studio. To view the course description and place an order, click on the picture below.

There are many photographers who specialize exclusively in portrait photography. And their passion is understandable: portrait photography is one of the most complex and interesting genres in photography, which reveals a person’s character.
Exciting? Then you just need to learn everything about portrait photography techniques.
Camera settings for portrait photography
- It is best to use aperture priority mode. An open aperture when shooting a portrait is the ideal solution. This way you will “blur” the background, create a bokeh effect, successfully highlighting the subject. Surely you assumed that we would give you the magic numbers of perfect settings suitable for any occasion. But, for example, we cannot say anything about certain aperture values, since the aperture will depend on specific cases, shooting conditions, as well as on the capabilities of the camera and its lens.
- To eliminate grain and noise, set the ISO to the lowest possible value. These parameters directly affect the brightness of the image and need to be adjusted based on the illumination, but we recommend setting the lowest value possible. However, the extent to which noise appears at high ISO depends on your camera and the optics it uses. And therefore, the photosensitivity settings will be individual in each case. Speaking of optics: if you want to devote yourself to portrait photography, then a portrait lens is simply the perfect solution.
- Since a person cannot stand still like a statue, but play with the model the game “Marine figure, freeze!” somehow not comme il faut, to avoid blurry pictures, just set the shutter speed to 1/60 - 1/125 seconds.
- Don't worry too much about white balance. Standard settings are also suitable for any conditions. If the soul requires more creativity, then there is always a manual mode M.
- Exposure metering mode is also an important parameter in portrait photography. Most modern cameras offer to perform the average, that is, over the entire frame. Also you can apply it on small area in the center of the frame (evaluative or spot).
Taking portraits indoors
If you are on a limited budget and do not have serious lighting equipment, and neither you nor your model can afford to rent a studio, just use the light from the window. Taking a portrait at home can be very successful if you shoot in a room with one window and light up parts of the face that are in shadow a little using a reflective screen. Place the screen about a meter or two from the model.
If you decide to shoot on a bright sunny day, when direct light mercilessly illuminates your face, we advise you to lightly cover the window with a light white fabric. This way you will be able to avoid unpleasant shadows on the model’s face (unless, of course, you wanted to turn this nuisance into the highlight of the photo).
Taking portraitsat home: practical advice
- Ask the model to stand sideways to the window at a distance of about one and a half meters. Position yourself with your back to the window so that the visual axis is perpendicular to the plane of the window.
- The background can be either plain walls or some bright element. To find the perfect angle, ask your model to walk around the room until you find the lighting conditions that best suit your idea. Since when shooting indoors you have to set a longer shutter speed, shooting a portrait with flash, unless you have a tripod, of course, is simply inevitable. Point the flash upward and attach the reflector so that it can cast light on the model.
- Here's a great lighting scheme for you quality results. Use a pair of electronic flashes, which you place at a distance of about one and a half to two and a half meters from each other. Use the main light source to give your subject the desired effect, and place additional light sources as close to the top of the lens as possible, using them to highlight shadows.
Below we have described several classical schemes lighting used for portrait photography in the studio.

1. Take two additional light sources and place them at a slight angle in relation to the model. This will help you add extra volume to your photo.
2. Direct one source parallel to the camera, place the other at an acute angle in relation to the model, securing it at a height of about three meters. Light the model's head third from behind and slightly from the side - this will allow you to create volume in the frame. Light the background with a fourth light source.
3. In order to soften the picture a little, use reflected light, which can be obtained by directing the lighting device at the walls and ceiling.
4. The simplest lighting technique is carried out using a single source - a reflective screen. The method is as simple as three pennies, but despite this, you can use it to create unusual lighting effects.
Taking a night portrait
Portraits on a black background with bright spots of color usually look very unusual and contrasting. True, such conditions require a good external flash and the absence of too long shutter speeds. For example, you won’t be able to set a shutter speed of thirty seconds. Because even the most powerful flash will not give the object clarity in such conditions, only if the model freezes in one pose for a long time.
And now we will try to describe the technique of taking portraits at night against the backdrop of the colorful lights of the city at night.
- Try setting the shutter speed from 1/15 to 1/10 sec.
- Set the aperture value not very large, in some cases f 1.8 is perfect.
- Photographing a portrait at night, as we have already said, involves using a flash. In principle, in the absence of an external flash, you can try the built-in one: just set the synchronization to the second curtain so that the picture does not turn out blurry.
- If you shoot with an external flash, you can set it up in the same way as the built-in flash. First try it on automatic; if this option doesn’t suit you, turn on manual mode and have fun with the settings all night long.
- Indirect light is best suited for this type of photography, so use umbrellas. If you have a synchronizer, place the flash on a tripod at 45 degrees, to the side of the model. This will give your photo depth and contrast.
- Want to make your background stand out more? Set your ISO settings to a high value.
Common mistakes when taking portraits

- Shooting using a wide-angle lens. This optic is not suitable for portrait photography, since it exaggeratedly conveys perspective. If you wanted to get a comical effect, go ahead, but if the shooting is artistic, then you should not use such a lens.
- Unsharp eyes. The eyes are perhaps the most important thing in a portrait and as such they need to be sharp, especially when you're shooting wide open to limit the depth of field.
- Depth of field too deep. Shooting with a closed aperture is also not the best best idea. A harsh background will distract from the main subject and the photo will not look good
- Objects sticking out of the head. This can happen if you don't pay enough attention to the background. Of course, the tree peeking out from the head or road sign can be removed in the editor during post-processing. But why burden yourself with unnecessary work when you can pay attention to the background and, if necessary, step slightly to the side.
- Wrong angle and height of shooting. The correct height for shooting is best determined based on the context of the image and the subject, but the best results, as practice shows, can be obtained by shooting from the eye level of the subject.
- Sharp shadows. Often such shadows do not provide a favorable effect for the photo.
- Red eyes. To avoid this, move the flash away from the lens (if it is not built-in, of course)
- Overkill with details. In pursuit of sharp eyes, we often forget about the rest. You should not use modes that increase saturation - they can highlight skin imperfections, which will then have to be retouched for a long time and painstakingly.

- Before you pick up a camera, you need to decide what kind of photo you want to get as a result. What is the purpose of your shoot? Perhaps it's business portrait, fashion photography, shooting for online promotion, or you just decided to take an artistic photograph of a friend. Think carefully about the settings and style of future shooting, based on the task assigned to you.
- Have you decided on the purpose of shooting? Great! In this case, it will be easier for you to choose the appropriate place for it. What might be ideal for realizing your idea? For artistic photo it could be a forest, an abandoned house or any other mysterious place. Fashion photography can be organized in a studio or stroll through the city at night. A business portrait can be taken in a cafe or office.
- If you are working outdoors in natural light, it is very important to consider the time of day at which the shooting will take place. We do not recommend shooting in the middle of a sunny bright day, when the sun is especially merciless, because direct light, the blinding rays of the sun, will complicate your work, and it will be quite difficult to avoid overexposure.
- Don't forget about the basics of chiaroscuro, which everyone studied in art classes at school. Harsh, harsh lighting creates dramatic shadows. If such an arrangement was not included in your plans, then try to create conditions under which the light would fall on the entire object at once. Soft light can create an effect that makes everything appear flatter, but it can save you from worrying about losing detail in dark or bright spaces.
- The advantage of working in a studio is the freedom to experiment with art using artificial light sources. In field conditions, this is, of course, impossible. But in the studio, you, as a photographer, hold all the cards! We can set different light patterns, move and adjust the height and tilt of the sources in accordance with the idea. In other words, working in the studio makes you feel like a master of light.
- It is very important to organize competent work with the model. Reach mutual understanding, find contact and win over a person. Don't think that the model can read your mind - communicate with her! Talk about what pose is best for her to take, where to look. Smile, joke, create a relaxed environment in which a person will feel comfortable and be able to open up.
If you are interested in portrait photography, training is a must. Ours can offer a large number of different courses that are conducted professional photographers. Everyone is welcome!