How to crop in Photoshop. How to Make Better Framing Using Photoshop. Perspective Crop Tool
Good day, dear readers. Today I will tell you how to crop a photo in Photoshop. We will look at not only the usual functions, but also touch on some very interesting techniques that you will definitely need in your work. So, without further ado, let's get started right away.

The easy way. What to do when you need to remove some elements

If you make it smaller, the margins that will be cropped will not be as bright as the area selected for cropping.

If you make the photo larger, additional fields appear. Sometimes they are displayed with a checker(), and sometimes they are filled with color, as in my case. In the end they will still be transparent. You can fill it with your own color if necessary.

Press Enter from the keyboard and you're done. The picture is cropped.
Create an even square from any photo in seconds
There is nothing easier than turning a rectangular photo into a square one. Select the frame again.

Hold down Shift on the keyboard and at the same time draw a shape in the picture using the mouse. Naturally, we hold down its left button to do this. In fact, we act as usual, just hold down Shift.

Release the mouse button and get this result. If you need to increase or decrease the square, drag these selected things, remembering to hold Shift. You can also move the photo itself, tugging on the soft edges to adjust the area you want to crop.

Ready. Press Enter.

Make a photo round in 5 minutes
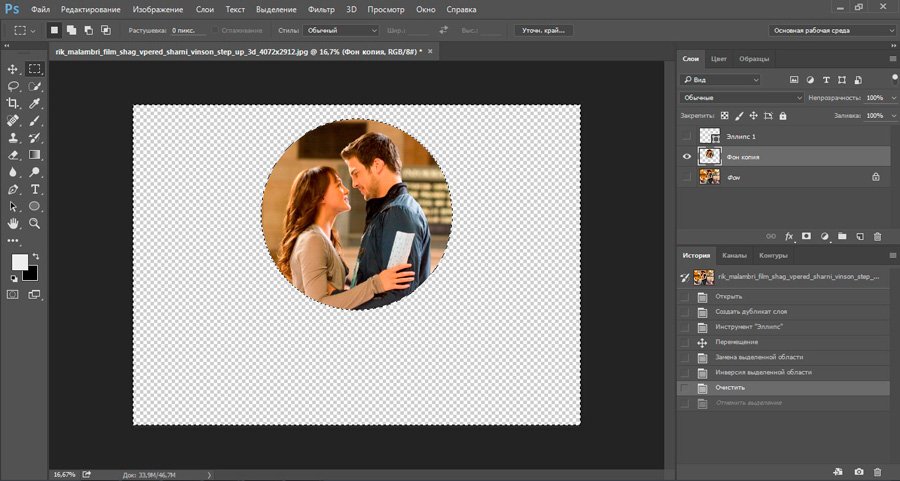
You can also cut a photo in a circle using shift. How exactly? The first step is to make a duplicate layer. We find the option in the layers menu.

Now select the ellipse.

If you can’t find it, then maybe you just have another tool and it’s hiding it. Press each button for a couple of seconds and release. An additional menu will appear.

It's best to remove the fill right away so you can see what you're cutting out. But be sure to leave the outline.

Start drawing an ellipse and hold down shift, then it will turn into an even figure. You can remove the selection after you have drawn.

Select movement.

We move the circle so that the area we need is in the center. Then we will cut it out from the overall picture.

Hold Ctrl and click on the center of the layer thumbnail, as shown in my screenshot. In any other place the miracle does not work.

Select selection – inversion.


Del on the keyboard. See how the background has changed to checkered? This means that part of the picture has become transparent.

Remove the “eye” icons from the other two layers, leaving only the one you need visible, with transparency.

This is the result you should get.
To deselect, hold down Ctrl and D at the same time.

Using the frame you can cut off the excess.

You already know how to do this. Don't be put off by the color black if you get it. The situation will change as soon as you click on Enter.


If you are going to use a photo on your website or somewhere else, you need to choose PNG to leave a transparent background. In any other case (jpeg, etc.) the transparent color will be replaced with white.

If you use png, then the picture can be superimposed on any background.

Save it as a jpeg and you will most likely not be pleased with the result.

By the way, if you liked this lesson, you can learn how to cut various shapes in other ways. It's already on the blog.
Cut to size. Correlation and correct approach to working with websites
First, let's understand the ratios. Let's say you need to make a photo from a picture for a website. Some photos will be 2 x 4 cm, others 20 x 40. You can do without Photoshop, the engine itself can adjust pictures to a certain size, you just need to upload a large image to the database. This must be done, because otherwise the database will store 12,000 identical images different sizes. This will negatively affect the attitude of others search engines to the portal.
I have already written about all this, so if this is your case, pay attention to this article on my blog.
So, open the photo and select a frame. We choose, for example, 4 x 5. You can put 3x4 - it doesn’t matter. It all depends on your desire and design.

Now, we determine the desired area that we will cut to size. You see, in cm it is much larger.

Pressed enter and cut it out. Ready.

Cut the picture to size. For example, for a passport
Now you can deal with cm. Select “Width x height x pixels”.


Without paying attention to the centimeter indicators, you can reduce it or increase it; the program will then cut everything to the size you need. When finished, click Enter.

Ready. The photo has become smaller.

Pixels
When it comes to websites, pixels are the most important. This is especially true for the design of home pages and so on. Select any of the proposed options from the list.

Replace the indicators with the required values.

Naturally, the frame can be rotated as desired.

After pressing Enter, everything will fall into place.

If you like working in Photoshop, but you don’t yet have all the information, I recommend you Zinaida Lukyanova’s courses, there is a lot of useful information here - Photoshop-master.org/education.php , quite quickly you can learn everything you need to work well in this program. This will give you serious benefits, you will no longer have to waste time searching for articles related to this program.
Even if you, like me, have Photoshop CC, then video will still suit you “ From A to Z » for version CS 5. The differences in the basic structures are small.

You can also find free lessons on YouTube or torrents, but in this case you will not have a clear picture and knowledge of the program. You will snatch information about one thing or another.
It's up to you to decide. With this I say goodbye to you, if this article was useful to you, subscribe to my blog and learn more useful information, which will definitely come in handy. See you again and good luck in your endeavors.
Very often, when processing photographs, it is necessary to crop them, since it becomes necessary to give them a certain size due to various requirements (sites or documents). In this article we will talk about how to crop a photo along its contour in Photoshop.
Pruning allows you to focus on the main thing, cutting off the unnecessary. This may be necessary when preparing for printing, publications, or for your own satisfaction.
Method 1: Simple Crop
If you need to cut out some part of a photo without taking into account the format, cropping in Photoshop will help you. Select a photo and open it in the editor. From the toolbar, select "Frame",


Method 2: Trimming to size
This technique will be useful when you need to crop a photo in Photoshop CS6 to a specific size (for example, for uploading to sites with a limited photo size or printing). Trimming is performed in the same way as in the previous case, using the tool "Frame". The procedure remains the same until the desired area is selected. In the options panel, select the item from the drop-down list "Image" and set the desired image size in the fields next to it.

When preparing to print photographs, you should keep in mind that not only a certain size of the photograph is required, but also its resolution (the number of pixels per unit area). As a rule, this is 300 dpi, i.e. 300 dpi. You can set the resolution in the same properties panel of the tool for cropping images.
Method 3: Processing while maintaining proportions
Often you need to crop an image in Photoshop, maintaining certain proportions (a passport photo, for example, should be 3x4), but the size is not important. This operation, unlike the others, is done using a tool "Rectangular area".


Method 4: Cropping and rotating the image
Sometimes you also need to flip a photo, and this can be done faster and more conveniently than in two independent steps. "Frame" allows you to do this in one motion: having selected the desired area, move the cursor beyond it, after which it will turn into a curved arrow. Hold it down and rotate the image as needed. You can also adjust the crop size. Finish the trimming process by pressing ENTER.

Thus, we learned how to crop photos in Photoshop using cropping.
In several lessons, I will show you the simplest techniques for working with Photoshop. Preparing photographs for printing and posting on the Internet. These lessons show the most necessary actions without which to prepare good photo, is simply impossible. The tools I show are available in all versions of Photoshop. If you have a different version than me, some of the tools may be in a different place, but they are there!
Lesson #1
Attention! Always make a copy of the photo, just in case, and then “mock” it! Because the original may come in handy when you are not satisfied with the result of your experiments.
Now open a copy of the photo in Photoshop. Press the button " crop"(1) or "Crop" if you have non-Russian Photoshop.
At the top of the properties panel, set the desired width and height of the image. Since we are preparing a photo for posting on the Internet, in order to maintain the proportions of the monitor screen, we will set, for example, the width to 1024 pixels and the height to 768 pixels.
In principle, here you can set any size. Simply, if you want the photo to be used as desktop wallpaper, then set it to 1920x1080, 1024x768, 1280x1024, 800x600.
If the photo does not fit into the wallpaper, or there are several photos on the page, then they need to be made smaller in size, otherwise site visitors may not wait for such a heavy page to load and will go to another site.
By the way, I am often asked how to make an avatar for the forum. And you do the same! Usually the maximum size of an avatar is 90x90. Therefore, set the Width to 90 px, Height to 90 px.

After clicking the "Crop" button, the cursor took the form of a "Crop" icon. Now, by clicking the left mouse button in the upper left corner of the photo, drag the cursor down and to the right. At the same time, the frame will stretch behind it. Release the button and the frame will freeze in place. But you can stretch it - squeeze it by the corners, grab it with the cursor and drag the entire frame from place to place. At the same time, it will strictly adhere to the proportion you set, so you will not be able to flatten the photo. In any case, the size you specify will be preserved!
By the way, if you are not going to maintain the proportion of the photo size, then leave the “width” and “height” fields empty. In this case, by stretching the frame by the sides with the cursor, you can make it wide or narrow, high or low. In short, the photograph will not standard size.
As a result of experiments, you will achieve a result when there is nothing unnecessary left in the frame, and the area of future cropping is darkened.
Now press the right mouse button while holding the cursor on the photo. A context menu will appear with the words “crop” and “cancel.” Click the “crop” menu item and you will see a photo of improved quality!

Note: You can now proceed to the photo saving step. In the future, when you gain experience, you can do all the steps to improve the photo (the next pages of the book) and only then save it.
You may be used to taking the crop tool, selecting a part and the images, and pressing Enter. You will be surprised, but there are many other uses for this tool. In this article, Helen Bradley describes the five "best-kept secrets" of cropping photos in Photoshop.
1 Rotate your crop
As you move the crop selection around your image you can also rotate the selection over any of the catches. It is interesting to know that double clicking on the selected area applies cropping. Holding down the Shift button sets the rotation increments to 15 degrees, and with the Alt button you can set the point around which the rotation occurs.
2 Correct perspective when cropping a photo
At the same time as cropping the photo, you can correct the perspective. To do this, you need to check the "Perspective" checkbox in the tool's properties panel. Now you can arbitrarily drag the corners of the image. Using the tool, you will again get a rectangular image. It is interesting to know that using the Shift key you will be able to drag only one of the lines while the second one will be fixed. With the Alt key you can edit the cropping area in normal mode with the “Perspective” checkbox turned on.
3 Cropping, but not really
Areas cropped during cropping can simply be hidden. To do this, you need to create a copy of the layer, select the crop area and set the "Hide" option in the toolbar. When cropping, part of the image will be hidden but still accessible.
Now you can select the move tool and move the image within the crop area. This is useful if you want to crop an image with fixed size parameters and want to experiment with the part of it that remains visible.
4 creating and using crop presets
When you click the crop tool button in the properties panel, you can select different presets from a drop-down list. You can change the preset's orientation from portrait to landscape by rotating it 90 degrees.
You can also create your own presets that you need only. To do this, you need to set the cropping parameters, and then select “New set of parameters for tool” in the preset drop-down menu. Enter the name of your set and click "yes". Your set will appear in the list of presets and you can use it in the future.
Don't forget that in addition to the linear dimensions of the image, you can set different pixel densities when cropping. If you leave the field empty, the density will not be attracted.
5 In the image and likeness
If you want to crop several images to the same size in the same way as the first one, select a sample image and click the “Image” button in the properties panel. The cropping parameters will be set to the parameters of this image. Now you can crop the rest of the pictures to the same size with the same proportions.
Attention!
If cropping is not working properly, press Esc to exit the tool and press the Clear button to reset the settings.
The next time you crop an image, remember that this tool offers many interesting options for working with it.
In this article, we'll look at how you can easily crop a photo to the size you need. We will be dealing with image resizing. Let's look at how to get standard size photos: 5 by 7, 8 by 10, or 11 by 14 without distortion and making everything appear elongated and thin or squashed and thick.
Here's an example of the problem. I get many of my photos from my Canon Digital Rebel XT, which has 8 megapixels. Here's a photo I took of it last winter:
Original photo
Now, let's assume that I want to print photos in 8 by 10 format. Since the photo was taken with an 8 megapixel camera, print the 8 by 10 photo with quality professional level shouldn't be a problem. Let's look at the length and width of this image in pixels so we can calculate what its overall size is.
I open the " Image Size" by selecting it from the " Image" menu. If we look at the section " Dimensions in pixels" at the top of the window, we will see that my photo, as I transferred it from the camera, has a width of 3456 pixels and a height of 2304 pixels:
Photoshop's Image Size dialog box showing the photo's pixel dimensions
Pixel size can tell us how many pixels our image is made up of, but it has nothing to do with the print size of the image. To view or resize a photo on print, we must refer to the section " Document Size».
Currently, the specified document length and width indicate that at a resolution of 240 pixels per inch, which is the standard resolution for professional quality printing, my photo will be printed at 14.4 by 9.6 inches. This is certainly a decent sized photo, but I probably won't be able to find a paper size that fits these dimensions.
Let's see what happens if I use the dialog box " Image Size“I’ll try to change the print size of the photo to 8 by 10. As a rule, this is the format we use when printing. Since my photo is in landscape orientation ( those. width is greater than height), I actually want a 10 x 8 photo.
So I change the width value in the " Document Size" by 10 inches. I want to make sure that when I resize the image's proportions are not distorted. So I select the option " Maintain proportions" at the bottom of the dialog box. Here I changed the width value to 10 inches:
Change the print size of an image in the Document Size section
After I changed the width of my photos to 10 inches since the option " Maintain proportions" was turned on, we can see in the picture that Photoshop itself changed the height of my photos to... 6.667 inches? This is not correct. We need a 10 by 8 format, not 10 by 6.667. Hmm... I guess I just need to change the height to 8 inches:
Change the image height in the Manual Document Size section
Okay, done. I changed the height of the photo to 8 inches, and now in the " Document Size"I see that my photo is in the format... 12 by 8?! Hey, what's going on? All I want to do is change the print size to 10 by 8. But if I change the width value then the height is not right for me and if I change the height the width is not right! How do I resize a photo to 10 by 8?
Answer: None. At least through the window " Image Size" The original dimensions of the photo will not allow you to change it to 10 by 8 without distorting the image. So what should we do? It's simple! We forget about the dialog box " Image Size».
Instead, we'll crop the photo to the sizes we need! To do this, we use Photoshop's Crop tool!
Step 1: Select the Crop Tool
The first thing to do is select “Crop” in the toolbar or press the letter C on the keyboard:
Selecting the “Crop” tool
Step 2: Enter the exact print dimensions you need in the Options Bar
If you look at the options bar at the top of the screen, with the Crop tool selected, you will see an option for Width and Height. Here you can enter the exact width and height values you need.
And also units of measurement ( inches, centimeters, pixels, etc.). Since I want to crop my image to 10 by 8, I enter 10 in the width field, followed by “in”, which means “inches”. After that I enter 8 in the height field and then "in" again:
Entering exact width and height values in the Options Bar
Step 3: Drag the Crop Frame
Once you've entered the exact dimensions, simply click inside the image and set the crop frame. The area of the photo inside the frame will remain, and everything else that is now slightly darkened will be cropped out. You will notice how when you stretch the borders of the frame, the sides change proportionally, since we set the exact parameters.
The only thing we can do is adjust the overall size of the border with the same aspect ratio. To do this, you need to pull one of the corners of the frame. You can also move the cropping frame within the image. To do this, move the cursor inside the frame ( it will take the form of a black arrow), and then click and hold down the mouse button and drag the frame:
Move a crop frame using the Crop tool
Step 4: Press Enter/Return to crop the image
Once you have the crop box dimensions and position set to your desired size, simply press Enter ( Win) / Return ( Mac) to crop the image.